The Practice of Prototyping: Part 3
Patrick Hansen | 01/11/2017
In this final post of the series, I will wrap up my tips for prototyping and leave you with some helpful tips, tools, and resources.
Conclusion
Plan and Set Expectations
The mechanism by which the prototype is built should be dictated by your objectives, resources, schedule, budget, and even the potential need for reusable assets. A prototype should be an efficient way to represent the final product. We mentioned earlier in this post that defining the objective upfront is important, and this includes any testing requirements. It will influence a lot of the prototyping process, including choosing the right approach.
Know Your Resources
Your team, tools, and resources you have available are the key to success. The prototype process can involve designers, developers, researchers, and others. Understanding who you have and what you have at your disposal is a big factor in what you should and can build.
Prepare Your Toolbox
The amount of tools that are available for prototyping today is vast. Technology has helped make many tools accessible, not just for software but for a variety of industries. Conduct some research on the tools available, and create a toolbox of resources that work well for your needs. You don’t have to be an expert at them all, but have enough understanding to choose the best ones for the job. Encourage your team to continuously explore new offerings on the market, which typically are created to help improve the process even more.
Conduct Research
Research is a crucial part of almost all design, and prototypes usually play a key role in that research. This doesn’t always have to be a time consuming and expensive effort. There are many lean ways and guerilla tactics to conduct valuable research on a budget and in a tight schedule. However, there is no escaping the fact that good research simply does take time and is one of the most valuable parts of the design process. A little research upfront pays off big in the long term.
Time Is Money, and Research Is an Investment
Of course budget and schedule are big factors for any project. There are ways to keep the process lean and still have valuable take aways. This process shouldn’t be viewed just as an additional expense or costly effort. It is a very crucial and essential part of building a product. Prototyping should be viewed as an investment that will likely yield a high return in a quality solution.
Helpful Tips
Prepare for change. Set up the expectation with the team that the design or concept may likely change from the original approach. It can be easy to get attached to the work that has already been done and have reservations about change. Quality solutions just take time, and that might mean changing a little or a lot. A bit of humility won’t hurt either.
If you are conducting usability testing, define what are you testing for. It’s always a good idea to write a protocol and script to help guide a session and ensure it stays on track. It will also help provide a better view of the scope of work that will require a prototype.
If you are working on a prototype for demonstration purposes, define the key points that you are trying to convey. For demonstrations, it is also a good idea to write a script to follow and tell a story that provides a holistic overview of a realistic scenario.
If you are using a prototype to communicate a design to others, such as the development team, then you can likely take a more fragmented approach and focus just on the areas you are working on.
Tools & Resources
There are plenty of prototyping tools and resources available. Choosing the right one can be overwhelming if you’re not familiar with each and every one of them. To help determine which one is right for your needs, consider the presentation and objective, along with the skills you and your team already have. It can be difficult to try to learn something new while working to gain insights.
Based on your objective, define the functionality, fidelity, and interactivity that you will require. This would include the presentation device like the desktop or on a phone.
Prototype Design Tools
There are some tools that come with both design and prototyping functionality built in along with integration with other design tools, such as Axure, Principle, and Proto.io. This means you can design within the application with built-in traditional design drawing tools, off-the-shelf components and widgets, along with the ability to stitch the views together to create interactivity and even add animations and transitions. Pending on experience with other design tools, the learning curve for these could range from low to moderate, but they are targeted towards designers without the need to have coding experience.
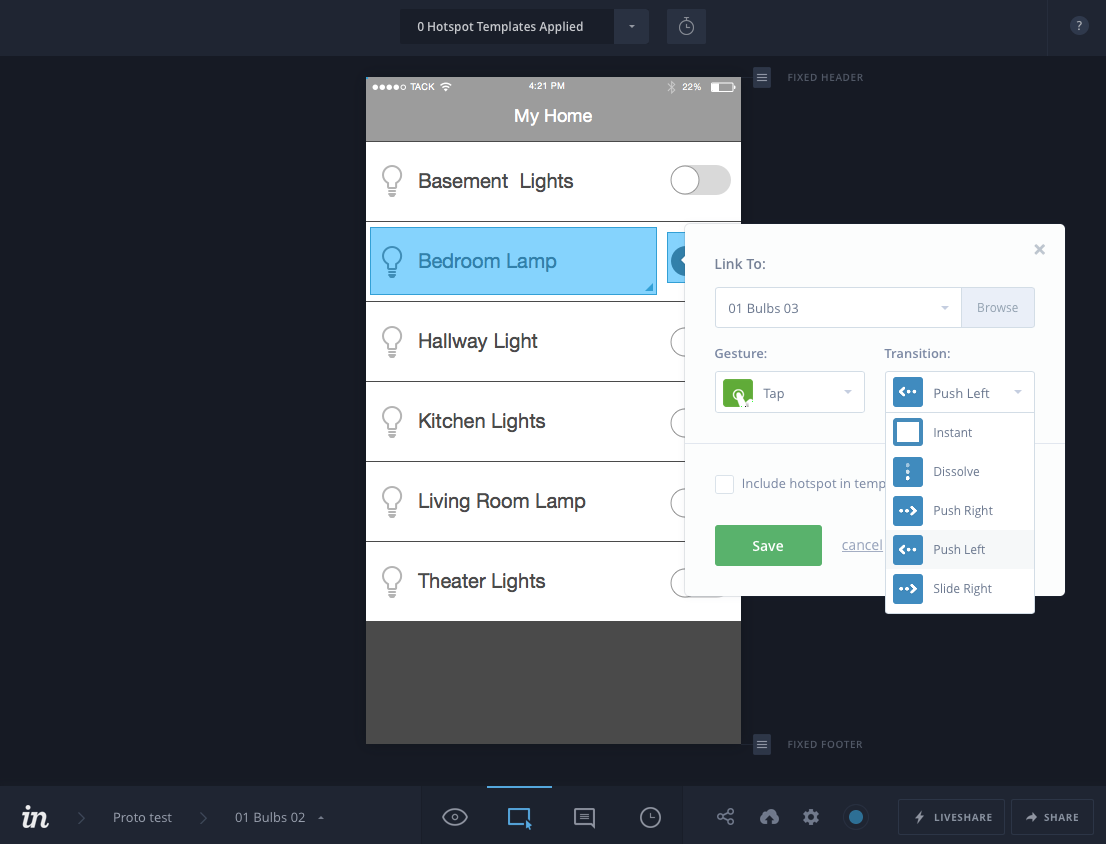
The screenshot above shows the Builder Mode of InvisionApp with its easy to manage interaction management menu.
Here are some links to some of the tools we have found useful.
Familiar Design Tools
If you prefer to use your own familiar design application like Photoshop, Illustrator, or Sketch, there are other tools that allow you to bring in screens from these other sources and integrate them together. Tools like InVision are great for this and offer a wide set of features for interactivity between the views, including some common mobile transitions, which add an extra layer of fidelity, orientation, and feeling of “reality.” With this approach, you can continue to use your favorite design tools, and there is no coding experience required. Some of the prototype specific apps can also be used to pull in designs from conventional tools noted below.
- sketchapp.com (there are a multitude of helpful plugins)
- adobe.com (Photoshop, Illustrator, XD)
- omnigroup.com/omnigraffle
Note: Sketch has become one of our new favorite design tools catered for UI design. It is continuously evolving and has a large community which is always enhancing its features and building plugins that extend its capabilities beyond just being just another design tool. InVision has also created some plugins to allow for prototyping directly with Sketch.
Code
When working on something very unique, you may have to opt for a more robust approach - likely using custom code either in web languages such as HTML/CSS and Javascript or something built natively in iOS, Android, or other platform. This code prototype approach obviously requires programming knowledge that can range from novice level needs to expert skills pending on the platform and complexity of your concept.
iOS and Android offer some visual building tools like Storyboard mode in Xcode and Android Studio. These are great tools where a designer could assist with production design and view layout in native mobile platforms. These options still may require some more intermediate to advanced level code skills (Swift/Objective C, Java) to get everything working together.
If your concept is web-based, there are a lot of web-based tools and frameworks that can help speed up the time of development. Frameworks such as Bootstrap, Foundation, and Semantic UI are great foundational platforms for web development. There are even hybrid mobile web solutions like Ionic Framework (Ionic Creator tool) and JQuery Mobile, which can be used to quickly put together a hybrid mobile web application concept in addition to using them to build out a final product.
There are also some nice online coding sandboxes where you can quickly dive into some HTML, CSS, and Javascript without having to set-up an entire project and/or local server. Codepen and JSFiddle are great resources for building out fast examples and demonstrations with web technologies.
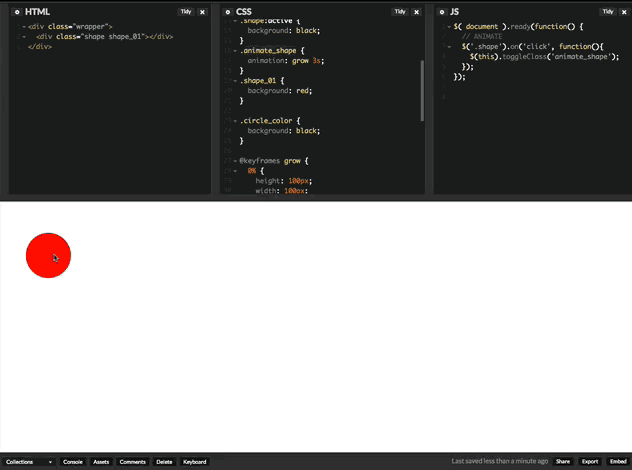
The animation above is an example of a CSS3 animation applied to a shape using HTML, CSS3, and JQuery within CodePen’s sandbox environment. Even something as simple as this could qualify as a prototype.
- creator.ionic.io
- jquerymobile.com
- developer.apple.com/xcode/ide/
- developer.android.com/studio/index.html
- jsfiddle.com
- codepen.io
- mockaroo.com
- generatedata.com
Hybrid Tools
There are some tools, like Framer Studio (uses FramerJs) and Ionic Creator, that offer great hybrid solutions and don’t require a designer to have too much coding experience but will still need some code to get everything working. Although they may have a bit of a learning curve for some, hybrid tools, like Framer Studio, allow for a wide range of interactivity, customization, data handling, dynamic content, and robust motion. Ionic Creator allows a visual way to build and code mobile web interfaces and can even be used for production development.
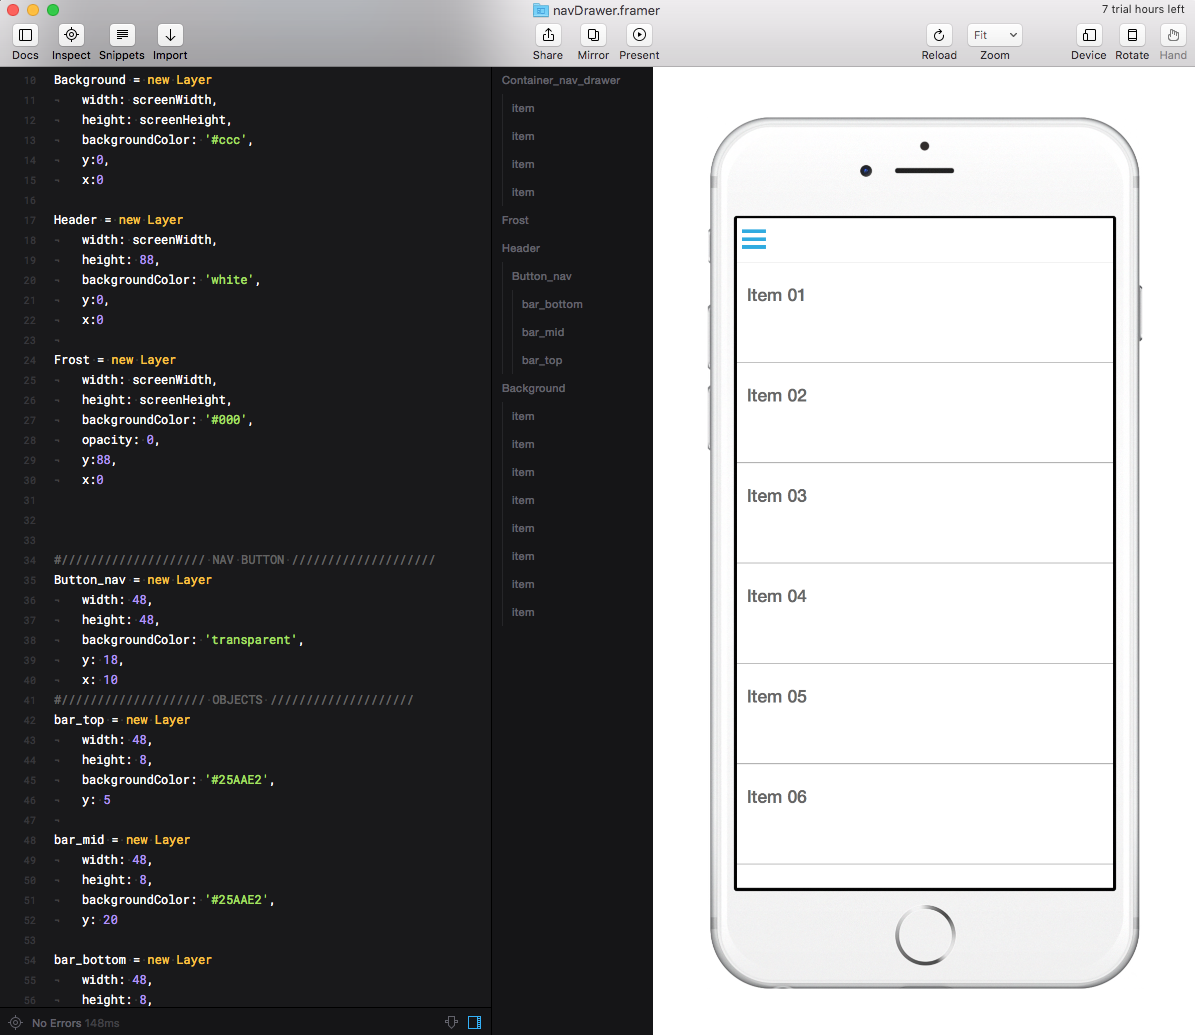
The screenshot above shows Framer Studio’s interface with the code view on the left and the compiled interactive view on the right within the chosen device frame (iPhone 6).
Video & Motion Graphics
Sometimes a prototype is used simply to visually demonstrate or present a concept. In these cases, it may be possible to deliver a prototype as a video simulation or something similar. Depending on your resources, this route could have a significant improvement on the amount of design and development efficiencies used during your prototype process. Sometimes motion can be accomplished more efficiently in video and motion production than with code. Your considerations would still likely require design efforts in addition to motion graphics/video production resources. This approach should also be weary of the translation ability with certain things that are more easily accomplished with video vs. with actual code.
- adobe.com/products/aftereffects.html
- apple.com/mac/keynote/ (can be used to create animations and videos)